First Time Climbing Kilimanjaro? A Complete Beginner's Guide for 2026
By Kilimanjaro Explore & Mount Kilimanjaro Guide
Standing at 5,895 meters (19,341 feet), Mount Kilimanjaro is Africa's highest peak and the world's tallest free-standing mountain. Every year, over 35,000 people attempt the climb. Roughly two-thirds succeed. For beginners, those numbers can feel intimidating – but they don't have to be.
The difference between success and failure often comes down to three things: route selection, physical preparation, and the quality of your guides. This guide, crafted by the travel consultants at Kilimanjaro Explore and the expert guides at Mount Kilimanjaro Guide, will walk you through everything you need to know as a first-time climber.
Let's be clear from the start: Kilimanjaro is achievable for beginners. You don't need technical climbing skills. You don't need to be an elite athlete. But you do need respect for the mountain, a solid preparation plan, and the right support team.
Part 1: Choosing Your Route – Marangu vs. Lemosho
Your first major decision is which route to take. For beginners, two routes stand out: Marangu (6 days) and Lemosho (8 days). Each has distinct advantages.
Marangu Route – The "Coca-Cola" Route
Duration: 6 days (5 nights on the mountain)
Accommodation: Shared huts with bunk beds
Success rate: 70–75%
Best for: Budget-conscious beginners who prefer not to camp
Marangu is the oldest and most established route on Kilimanjaro. It's often called the "Coca-Cola Route" because it's considered the easiest and most comfortable – though don't let that fool you. The final ascent to Uhuru Peak is still brutally challenging.
The hut advantage: Instead of sleeping in tents, you'll stay in wooden A-frame huts with bunk beds, communal dining areas, and even basic toilet facilities. This means less gear to carry and a warmer night's sleep.
The catch: Marangu's 6-day itinerary offers less time for acclimatization than longer routes. Climbers follow a "climb high, sleep low" pattern on day three, but many still feel the effects of altitude. The success rate reflects this – 70-75% is respectable but lower than Lemosho.
Who should choose Marangu: Solo travelers, budget-conscious climbers, anyone uncomfortable with camping, and those with limited time.
Lemosho Route – The "Whiskey" Route
Duration: 8 days (7 nights on the mountain)
Accommodation: High-quality camping tents
Success rate: 95%
Best for: Beginners who want the highest chance of summiting
Lemosho begins on the western side of the mountain, far from the crowds. You'll trek through pristine rainforest, heathland, and alpine desert before joining the main approach near the Barranco Wall.
The acclimatization advantage: Eight days on the mountain means more time for your body to adjust to altitude. The itinerary includes a "climb high, sleep low" day at Lava Tower (4,600 meters) before descending to sleep at Barranco Camp (3,900 meters). This single day dramatically improves your summit odds.
The camping experience: Don't worry if you've never camped before. Your crew handles everything – setting up tents, cooking hot meals, and filtering water. You'll sleep in quality three-season tents with sleeping pads. Many beginners actually prefer camping once they experience the camaraderie of the nightly campfire.
Who should choose Lemosho: Beginners serious about summiting, those with 8-10 days available, anyone willing to camp for a higher success rate.
What about other routes?
Northern Circuit (9+ days) offers even higher success rates (95%+) but requires more time and budget. Machame (7 days) is popular but steeper and more crowded than Lemosho. For beginners, Lemosho is the strongest recommendation.
Part 2: Training Smart – Your 4-6 Month Plan
Here's the truth that many guidebooks gloss over: Kilimanjaro is not a hike – it's a high-altitude endurance challenge. Your training should reflect that.
The Cardio Foundation (Months 4-6 before climb)
Start with 3-4 cardio sessions per week:
Walking or hiking: 1-2 hours at a moderate pace. Find hills or stairs whenever possible.
Cycling: 1 hour sessions build leg strength without joint impact.
Stair climbing: The single best Kilimanjaro training activity. Find a stadium, office building, or stair machine. Aim for 45-60 minutes of continuous climbing.
By month 2 before your climb, you should be comfortable walking 6-8 hours at a steady pace.
Strength and Load Carrying
Once per week, hike with a backpack weighing 5-10 kg (11-22 lbs) – roughly what you'll carry on summit day (water, snacks, camera, extra layers).
Gradually increase to 10-15 kg (22-33 lbs) for training hikes. This builds the specific muscle endurance you'll need.
Sample Weekly Training Schedule (2-3 months before climb)
Day | Activity |
|---|---|
Monday | Rest or light stretching |
Tuesday | 60-minute stair climb or hill repeats |
Wednesday | 45-minute cycling + core work |
Thursday | 90-minute walk with 5 kg pack |
Friday | Rest |
Saturday | 4-6 hour hike with 8-10 kg pack |
Sunday | 60-minute recovery walk |
The "Don't Skip This" Advice
Train with the gear you'll use on the mountain. Wear your hiking boots on long training walks – broken-in boots prevent blisters. Use your backpack. Practice layering clothes. The more familiar your body is with the equipment, the fewer surprises you'll face on the mountain.
Part 3: Health Preparation – Altitude, Medications, and Your Doctor Visit
Altitude sickness (Acute Mountain Sickness or AMS) is the number one reason climbers fail to summit. It affects people regardless of age, fitness, or previous experience.
Visit Your Doctor 2-3 Months Before Travel
Schedule a travel medicine appointment and discuss:
Acetazolamide (Diamox) – This medication helps prevent and treat AMS by speeding up acclimatization. Typical dose: 125mg twice daily starting the day before ascent. Common side effects: tingling fingers and toes, increased urination, carbonated drinks tasting flat. These are normal and not dangerous.
Malaria prophylaxis – Required if you're spending time in lower elevations (Moshi, Arusha, or safari extensions). Options include doxycycline or malarone.
Vaccinations – Ensure routine vaccines are current. Consider hepatitis A, typhoid, and yellow fever (required if arriving from an endemic country).
Personal medications – Bring enough for the entire trip plus extras. Altitude can affect how your body processes medication.
Recognizing Altitude Sickness Symptoms
Mild (common, manageable) | Moderate (descend immediately) | Severe (emergency evacuation) |
|---|---|---|
Headache | Severe headache not relieved by medication | Loss of coordination |
Nausea | Vomiting | Confusion |
Fatigue | Shortness of breath at rest | Coughing pink or bloody phlegm |
Dizziness | Blue lips or fingernails | Unconsciousness |
The golden rule: If symptoms worsen during a climb or at rest, descend immediately. There is no shame in turning back – only in ignoring your body's warning signs.
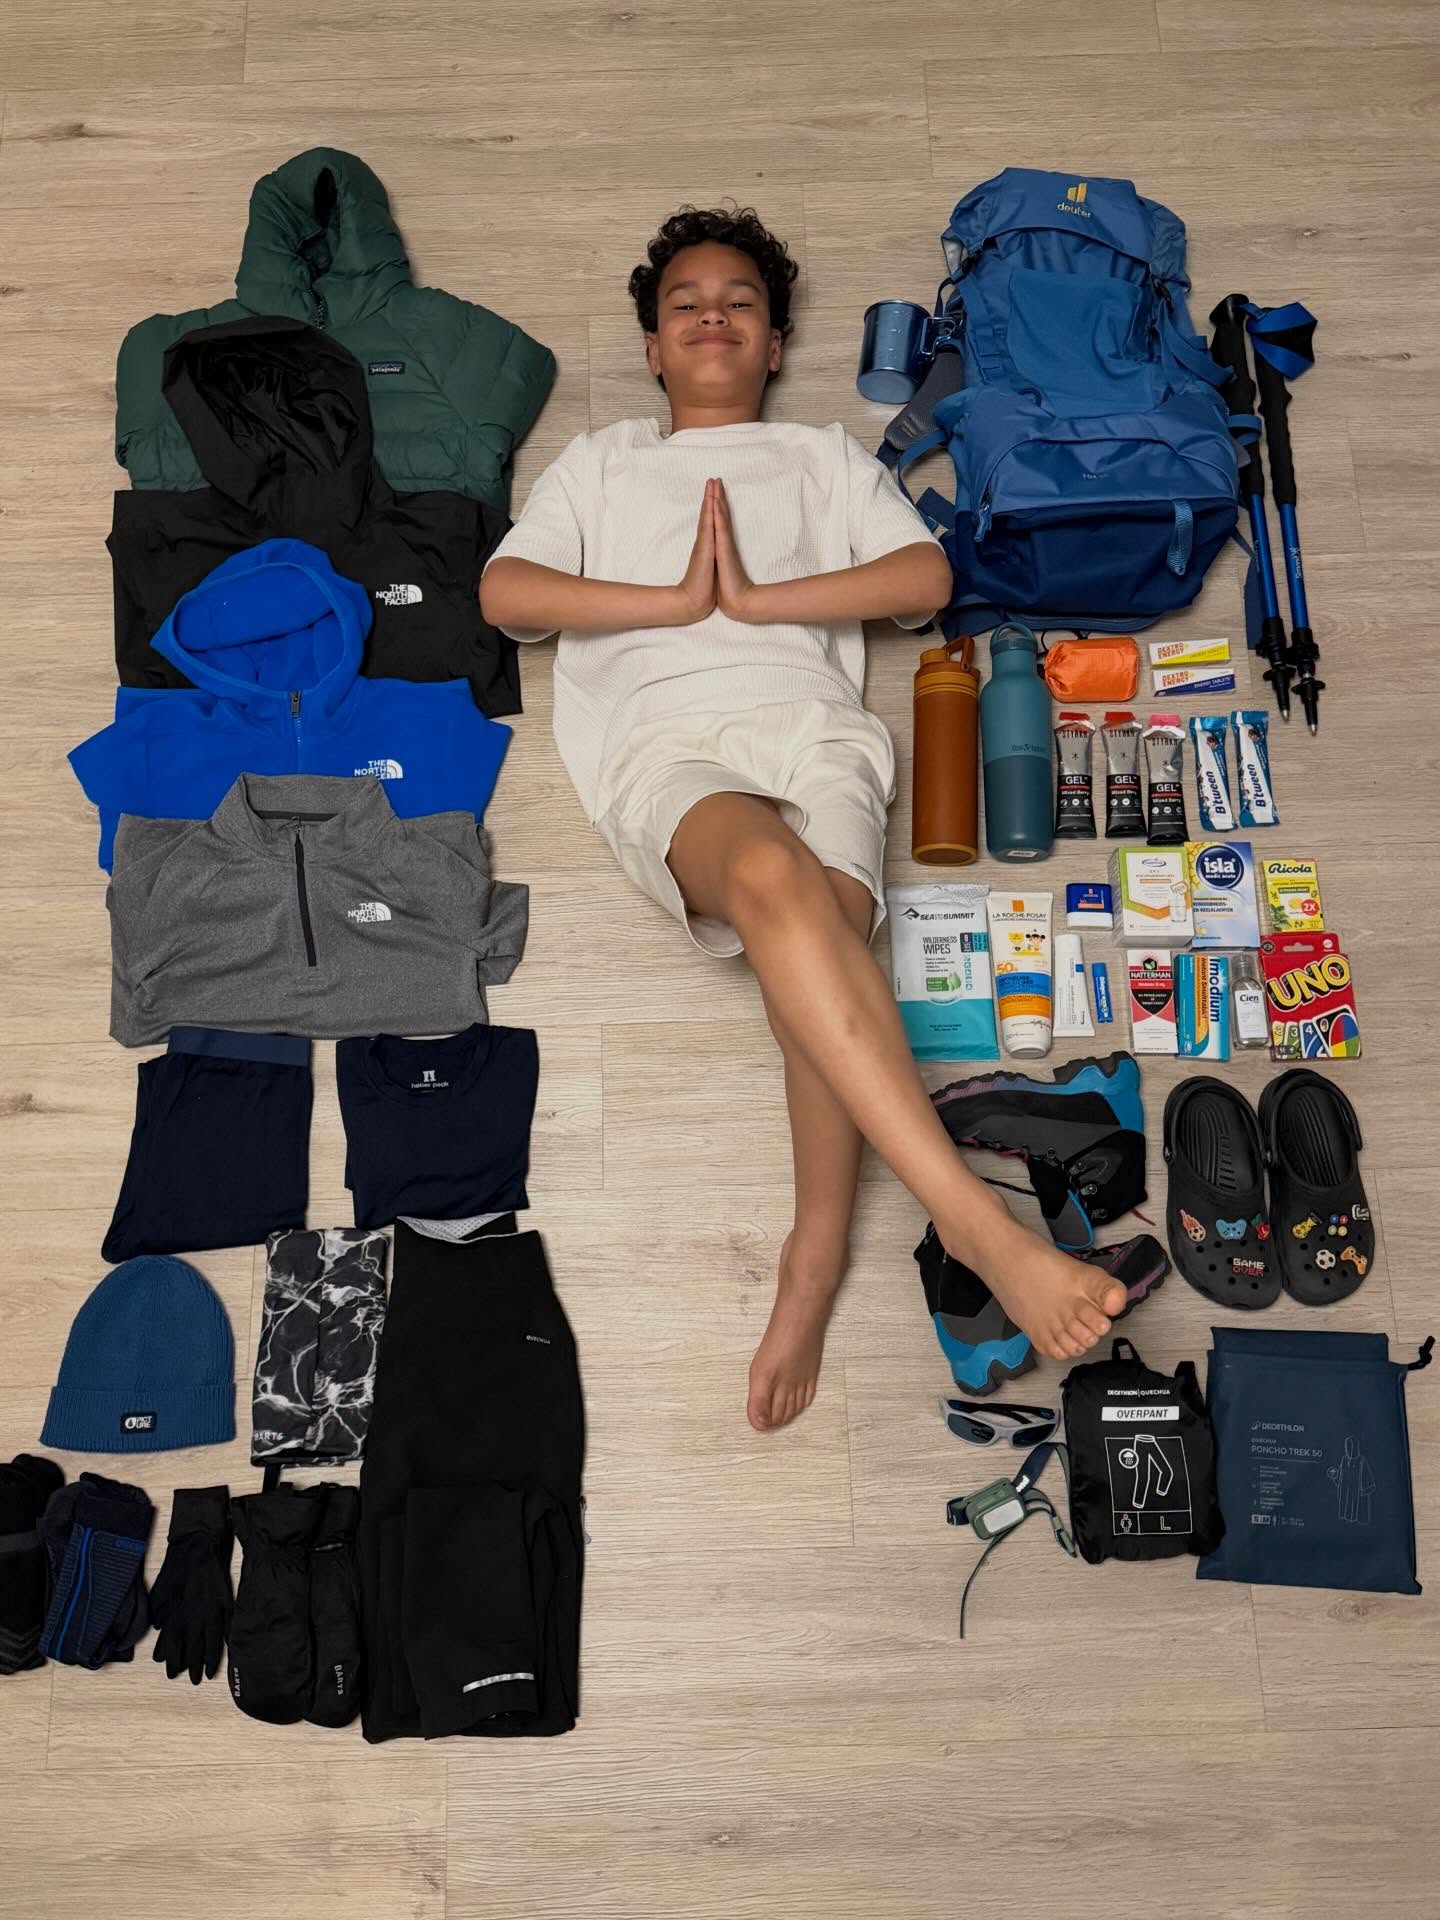
Part 4: Packing Right – What You Actually Need
Beginner climbers often overpack (adding unnecessary weight) or underpack (missing critical cold-weather gear). Here's the essential list.
The Layering System (Non-negotiable)
Layer | Purpose | Example |
|---|---|---|
Base layer (top & bottom) | Wicks sweat, worn next to skin | Merino wool or synthetic long underwear |
Mid layer | Insulation | Fleece jacket or lightweight down vest |
Outer layer (soft shell) | Wind resistance, light protection | Hiking pants, soft shell jacket |
Hard shell | Rain, snow, wind protection | Waterproof breathable jacket and pants |
Summit insulation | Extreme cold (below freezing) | Heavy down jacket, insulated pants |
Critical Gear Checklist
Footwear:
Sturdy, waterproof hiking boots (broken in for at least 50 km before arrival)
Thick wool hiking socks (3-4 pairs)
Liner socks (to prevent blisters)
Sleep System:
-10°C (14°F) sleeping bag – Down is lighter but loses insulation if wet. Synthetic is heavier but performs better in damp conditions.
Sleeping pad liner (often provided by outfitter – confirm)
Accessories (Don't Forget These):
Headlamp with extra batteries (for summit night)
Sun protection: SPF 50+, lip balm with SPF, wide-brim hat, UV-blocking sunglasses
Water bottles or hydration bladder (3-4 liter capacity)
Trekking poles (reduce knee strain by up to 25%)
Hand warmers (inexpensive and invaluable on summit night)
Renting vs. Buying – A Money-Saving Tip
You don't need to buy everything. Kilimanjaro outfitters offer rental gear that is perfectly adequate:
Sleeping bag (-10°C rating): Rent for $20-30
Down jacket: Rent for $15-25
Trekking poles: Rent for $10
Sleeping pad: Often included free
Buy your own: Boots, socks, base layers, headlamp, sunglasses. These need to fit perfectly and perform reliably.
Part 5: Mental Preparation – The 80% Factor
Experienced guides will tell you that Kilimanjaro is 20% physical and 80% mental. Your body may be capable, but your mind will try to quit at 4,500 meters, at midnight, in freezing temperatures, with thin air and exhaustion pressing down.
Pre-Climb Zoom Briefings
Most reputable outfitters, including Kilimanjaro Explore, offer pre-climb video briefings. These 60-90 minute sessions cover:
Detailed day-by-day itinerary
What each altitude feels like (honest descriptions, not sugar-coated)
Common challenges and how to overcome them
Q&A with guides who've summited 100+ times
Attend these briefings. Write down your questions beforehand. The more you visualize the climb, the less intimidating it becomes.
Mental Strategies for Summit Night
Summit day begins around 11 PM or midnight. You'll climb for 6-8 hours in darkness, temperatures well below freezing, with half the oxygen of sea level.
The "One Step" Rule: Don't think about the summit – it's too far away. Don't think about the next hour – it's too long. Just think about the next step. Then the next one.
Positive self-talk: Prepare phrases to repeat when your mind falters. "I trained for this." "My guides have done this hundreds of times." "This discomfort is temporary – the summit is forever."
Distraction techniques: Count steps in sets of 100. Mentally recite song lyrics. Play the "alphabet game" (animals, countries, names for each letter). Anything that shifts focus from suffering to rhythm.
Part 6: The Guide Difference – Meet Gilberto Bureta
Your guides determine whether you summit or turn back. This isn't an exaggeration.
Gilberto Bureta has led over 100 successful Kilimanjaro summits. He's been climbing the mountain since 2018 and knows every trail, every campsite, and every sign of altitude sickness before most climbers notice anything wrong.
What makes guides like Gilberto essential for beginners:
Pacing: He sets a "pole pole" (slowly, slowly) rhythm that conserves energy and promotes acclimatization. When you feel like walking faster, he'll remind you why you shouldn't.
Health monitoring: Guides check your blood oxygen levels (using a pulse oximeter) and ask about symptoms multiple times daily. They carry oxygen and emergency medications.
Motivation: At 5,000 meters, when you're exhausted and cold and questioning every life choice that led to this moment, a good guide doesn't push – they encourage. They share stories. They sing. They remind you why you came.
Safety decisions: Guides have the authority to turn climbers back if they show dangerous symptoms. This is not a failure – it's a lifesaving judgment.
When booking your climb, ask: "What is your guide-to-climber ratio?" (1:2 or 1:3 is ideal for beginners). "How many summits has my lead guide completed?" (50+ is excellent). "What altitude medical training do guides have?" (Wilderness First Responder or equivalent is best).
Final Thoughts – Your Kilimanjaro 2026 Journey Starts Now
Climbing Kilimanjaro as a beginner is absolutely possible. Every year, thousands of first-time trekkers stand on Uhuru Peak and watch the sunrise over Africa. They are not professional athletes. They are not mountaineers. They are ordinary people who prepared properly, chose the right route, and trusted their guides.
Your next steps for a 2026 climb:
Choose your dates – Dry seasons are January-March and June-October. Book 6-12 months ahead for best availability.
Select your route – Lemosho (8 days) for maximum success rate; Marangu (6 days) for hut comfort.
Start training – Begin cardio now. Add weighted hikes 4 months before departure.
Visit your doctor – Schedule 2-3 months ahead to discuss Diamox and vaccinations.
Book with a reputable outfitter – Ask about guide qualifications, group sizes, and emergency protocols.
Remember: The mountain will always be there. If weather turns bad or your body isn't ready, there is no shame in trying again. But with proper preparation – the kind outlined in this guide – you have every reason to believe that your first attempt will be your successful attempt.
For personalized advice, route planning, or to book a pre-climb Zoom briefing, contact the travel consultants at Kilimanjaro Explore or the expert guides at Mount Kilimanjaro Guide. Your adventure of a lifetime awaits.